
As an Amazon Associate I earn from qualifying purchases and sometimes recommend products from other sellers at no extra cost you. For more details see my disclosure policy and privacy policy.
Your investigators are standing in the rain outside Arkham, the mythos cup is full of bad ideas, and somebody at the table has just asked, “Wait, how many actions do I get?” That pause is where most first games of Arkham Horror slow to a crawl.
The game is not hard, but it does ask you to hold four phases, a handful of tests and a creeping doom track in your head at once. This guide walks through one full round in the order you will actually play it, so the rules click into place before the first monster shows up.
One quick clarification before we start. This covers Arkham Horror (Third Edition), the cooperative board game from Fantasy Flight Games and Asmodee. It is not Arkham Horror: The Card Game, which is a different product with different rules, and it is not the older 2005 edition. If you are still choosing between them, our Arkham Horror card game vs. board game comparison will sort that out.
🕯️ What Arkham Horror Third Edition Is Really About
Arkham Horror is a cooperative game for one to six players. Everyone controls an investigator, and together you work against the game itself. There is no traitor and no rival, only a scenario that wants to end badly for you.
Each scenario has its own goals, and the game tracks your progress through cards called the codex. You win by pushing those cards forward in the right direction until one of them says the investigators have won. You lose in two main ways: the story moves the wrong way because doom piles up, or every investigator is defeated, devoured or retired.
That structure is why the game feels like a story rather than a race. The rulebook for your chosen scenario tells you what matters this time, and the core rules tell you how everything else works.
If you want to see how this stacks up against the other big Lovecraftian games, the Arkham vs. Eldritch Horror vs. Mansions of Madness breakdown covers the differences without us repeating them here.
📦 Components and Setup, Without the Panic
The box looks intimidating the first time you open it. Once you see how the pieces group together, setup becomes a routine job rather than a puzzle.
Here is how to think about what is on the table.
- The board: Neighbourhood and street tiles that you lay out the way your scenario sheet shows.
- The decks: Event cards, monsters, headlines, and separate piles for items, allies and spells.
- The mythos cup: An opaque container full of tokens that decide what goes wrong each round.
- Your investigator: A sheet with skills, health, sanity and a focus limit, plus starting possessions.
The scenario sheet is your setup bible. It tells you which tiles go where, which monsters start in play, which tokens go into the mythos cup and how many headline cards to deal. Follow it step by step the first time rather than from memory.
✅ A Quick Table-Prep Checklist
Run through this before anyone rolls a die. It saves the awkward mid-game moment of discovering a deck is missing.
- Pick one scenario and keep its sheet where everyone can read it.
- Build the board from the neighbourhood and street tiles the sheet specifies.
- Shuffle the scenario’s event deck and set up the monster deck, placing any starting monsters on the board.
- Fill the mythos cup with the tokens your scenario calls for.
- Make the headline deck, then separate item, ally and spell decks, and lay out the item display row.
- Sort tokens and dice into reach of every player.
- Let each player choose an investigator and gather their starting possessions, and choose a leader.
- Place starting clues and doom as the scenario instructs, then resolve any scenario-specific opening steps.
For a first game, most groups start with the beginner scenario that ships with the box, “Approach of Azathoth”. It teaches the core loop without piling on extra rules.
🔄 The Four Phases of a Round
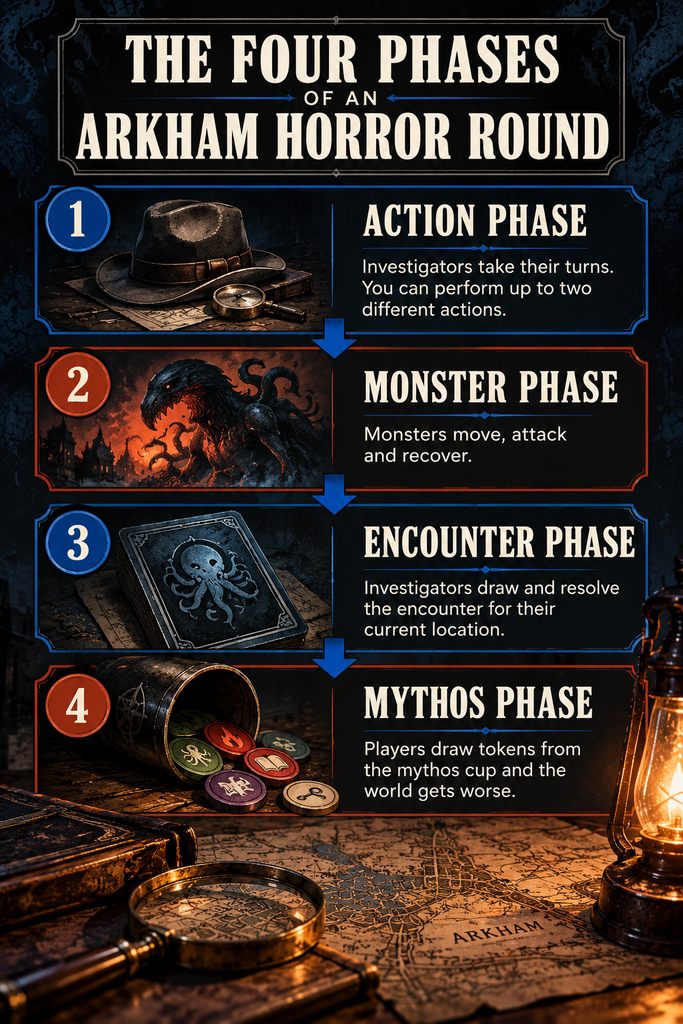
Every round runs through the same four phases in the same order. Learn this loop and you have learned the skeleton of the game.
- Action phase: Investigators take their turns.
- Monster phase: Monsters move, attack and recover.
- Encounter phase: Investigators draw and resolve encounters where they stand.
- Mythos phase: Players draw tokens from the cup and the world gets worse.
Notice the pattern. You get to act freely first, then the game pushes back three times in a row. Good play is about using your action phase well enough to survive what follows.
🏃 Phase One: Taking Your Actions
In the action phase, each investigator takes a turn, and the group decides the order. On your turn you can perform up to two actions, and each action can only be used once per round. That limit is worth saying out loud at the table, because it stops people from, say, researching twice in a row.
Here are the actions, in plain English.
- Move: Shift your investigator across the board. You get a short free move and can pay money to stretch it a little further.
- Gather resources: Pick up a dollar. Boring, reliable, and sometimes exactly what you need before a shopping trip.
- Focus: Take a focus token, up to the limit on your investigator sheet. You can spend it later to improve a test.
- Ward: Make a Lore test to push back doom. It is your main way of cleaning up the board.
- Research: Make an Observation test to turn effort into clues on the scenario sheet.
- Attack: Make a Strength test against a monster to wound it.
- Evade: Make an Observation test to slip away from monsters you are engaged with.
- Trade: Swap items, allies, spells, money and clues with another investigator in your space.
Some cards also give you special actions of their own, written on the card. Treat them like any other action when it comes to your two-action allowance.
🧲 Why Engagement Changes Everything
When a monster is engaged with you, you are on a short leash. Your options shrink to attacking, evading or focusing, so you cannot just wander off and ward the street.
That is why the Evade action matters so much. If you get away from every engaged monster, you earn a bonus action, which can be the difference between a clean turn and a lost one.
There is also a status called delayed. If you become delayed, you tip your investigator token over, take only one action on your next turn and then stand back up.
🎲 Skill Tests: Dice, Successes and Clues
Almost everything dramatic in Arkham Horror resolves through a skill test. Once you understand one, you understand all of them.
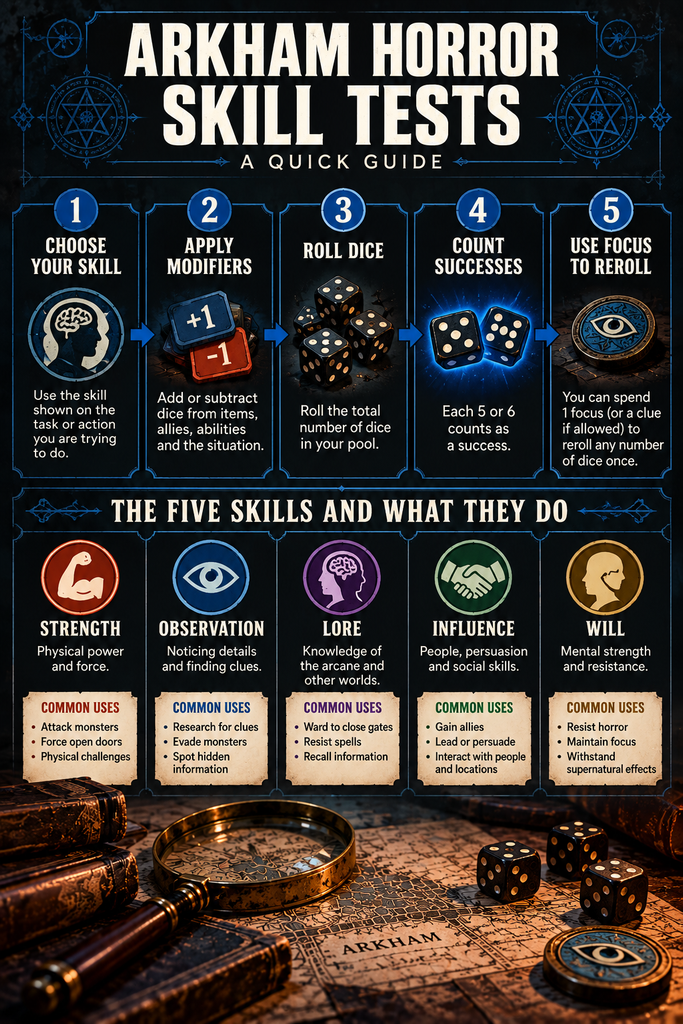
You start with the number on your investigator sheet for the skill being tested. That number is the number of dice you roll, with modifiers from items, allies, spells or monsters adding or removing dice. You always roll at least one die.
Every die that shows a five or a six is a success. One success or more means you passed. Zero successes means you failed, and the card or rule that asked for the test tells you what happens next.
♻️ Rerolls and Where Clues Fit
After the roll, you can spend a focus token or a clue to reroll a single die. You can do this before the result is final, and some cards add their own bonus successes or rerolls on top.
This is the real use of clues in the moment. They are not just score for the scenario, they are also an emergency button for a roll that went wrong. Spending one is a real decision, because the clue could have been progress.
Which skill you test depends on the action. Strength powers attacks, Observation powers research and evasion, and Lore powers wards. If your investigator is weak in the skill you need, consider letting a teammate with better dice take the job.
⚔️ Combat, Monsters and the Monster Phase
Monsters live on the board, and when one enters your space it engages you. When you take the attack action, you choose a monster, engage it if you are not already, and make a Strength test. Each success deals one damage to it, and the monster is defeated when its damage matches its health.
Monsters can have an attack modifier and an evade modifier that change the number of dice you roll for those tests. If you are engaged with more than one monster and try to evade, use the modifier that gives you the fewest dice. Each success disengages and exhausts one monster, so fewer dice means fewer escapes.
Some monsters carry a remnant icon, and killing one gives you a remnant. Remnants matter later when you cast spells, because they can stand in for the horror you would otherwise take.
🌙 What Happens in the Monster Phase
The monster phase has three steps that always run in the same order.
- Ready monsters activate: Hunters move toward a specific investigator, patrollers head toward a type of location, and lurkers trigger an effect instead of moving.
- Engaged monsters attack: Each one deals the damage and horror shown on its card to the investigator it is engaged with.
- Exhausted monsters ready: They flip back up, and if an investigator is in their space, they engage.
Because attacks come before exhausted monsters recover, evading a monster does not mean you are permanently safe. It buys you a round, not the rest of the game.
💔 Horror, Damage and Getting Defeated
Every investigator has two numbers that matter when things go badly. Health measures how much damage you can take, and sanity measures how much horror you can bear.
When a monster or an effect hurts you, you place damage or horror tokens on your investigator sheet. If damage reaches your health or horror reaches your sanity, you are defeated. Either track can be the one that kills you.
You can sometimes spread the pain around. Allies and items with their own health or sanity values can soak up damage or horror in your place, and they are discarded if they take too much. Anything described as direct damage or direct horror skips that protection and must land on you.
🪦 What a Defeat Actually Costs
Defeat is not the end of your evening, but it stings. You disengage and exhaust any monsters you were fighting, discard all your cards and tokens, and place a doom on the scenario sheet.
Then you pick a new investigator you have not played yet, gather their sheet and starting possessions, and they arrive at their starting space once the current mythos phase has finished. While your seat is empty, the game still keeps drawing for you in the mythos phase, but you skip your own encounters.
The lesson is that a defeat is a setback, not a stop sign. Plan around it rather than panicking about it.
🗺️ The Encounter Phase
After monsters have had their turn, every investigator who is not engaged with a monster takes an encounter. The group picks the order.
What you draw depends on where you are standing. In a neighbourhood space, you draw from that neighbourhood’s deck and resolve the encounter that matches the name of your space. On a street space, you draw from the street deck and resolve the encounter that matches the street type.
If an investigator is engaged with a monster, they skip this phase. That is another reason to deal with monsters promptly rather than ignore them.
Encounters can give you clues, items, allies and sometimes trouble, and the cards tell you exactly what to do. Event cards that lead to a clue are discarded, and the ones that do not go back into the deck near the top, so a neighbourhood can feel like it remembers you.
☠️ The Mythos Phase and the Doom Track
This is the phase where Arkham fights back. The leader draws first, then play goes clockwise, and each investigator draws two tokens from the mythos cup, one at a time, resolving each as it appears.
The tokens do different jobs.
- Spread doom: Reveals the bottom event card and places a doom in the space it marks.
- Spawn monster: Draws the bottom monster and puts it on the board as its text says.
- Read headline: Draws a headline card, which resolves for the investigator who drew the token.
- Spawn clue: Places a clue in the matching neighbourhood and reshuffles the event card back near the top.
- Gate burst: Puts a doom in every space of a neighbourhood and reshuffles that event card into the discard pile.
- Reckoning: Triggers every reckoning effect on the cards currently in play.
- Blank: Does nothing, which feels wonderful every single time.
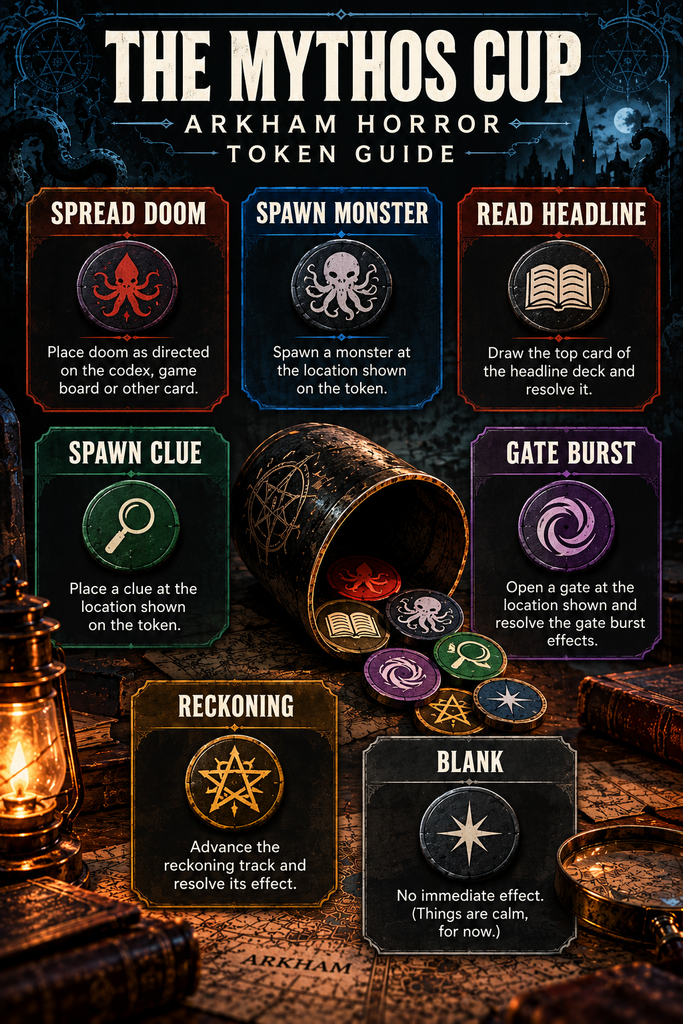
When the cup runs dry, return every token to it and keep going. It is a reminder that the game is never really finished with you.
🌀 How Doom Turns Into Anomalies
Doom sits on spaces on the board until you do something about it. In scenarios that use them, if a single space collects three doom, or a whole neighbourhood collects five, an anomaly token appears there.
Anomalies are bad news. An investigator in an anomaly neighbourhood has an anomaly encounter instead of the normal one, and further doom placed there heads for the scenario sheet instead, pushing the game toward its losing outcome.
The way out is the Ward action and the anomaly encounters themselves. When a neighbourhood reaches zero doom, the anomaly token comes off. Gates and similar effects vary from scenario to scenario, so always check your scenario sheet for how doom feeds the bigger threat.
🏁 How the Game Ends
You win by moving your scenario’s codex cards in the right direction until one declares victory. Usually that means gathering enough clues on the scenario sheet while keeping doom from running away from you.
You lose if the codex moves the other way, or if every investigator is gone. Doom is the main thing that pushes the story backward, which is why wards and cooperation matter so much.
There is no single universal ending in the rules. Each scenario tells you exactly what a good ending and a bad ending look like, so read its sheet before you start and again when the codex changes.
⚠️ Five Common Rules Mistakes at the Table
Almost every first game hits at least one of these. Knowing them in advance saves a lot of rummaging through the book.
- Repeating actions: You get two actions per turn, but each one only once per round.
- Forgetting engagement limits: Engaged investigators can only attack, evade or focus.
- Skipping the encounter by accident: Everyone not engaged takes an encounter, every round.
- Treating clues as only points: They are also rerolls, so spend them deliberately.
- Ignoring the order of monster steps: Attacks happen before exhausted monsters ready, so an evaded monster comes back.
If your group likes a more tactical read on how to work together, our guide to the alpha player problem in cooperative games will help everyone keep a voice at the table. For wider habits that make co-op nights smoother, the cooperative strategy guide on communication and role assignment is a good companion.
🎯 Your First Round, Summed Up
Here is the whole loop in a nutshell. You take up to two different actions, monsters move and bite, you draw an encounter if you are free, and then the mythos cup adds more trouble. Repeat until the codex says the story is over.
Most of what feels confusing on turn one gets easier by turn three. If you only remember one thing, remember that skill tests are just dice counts with five and six as successes, and everything else hangs off that.
Ready to play? Set up the board, pick your investigators, read your scenario sheet once more and draw your first token. Arkham is waiting, and it is not going to be gentle.
📚 Continue Your Journey
If this guide got you into the mood for more cosmic dread, these pieces on the site are the natural next steps.