
As an Amazon Associate I earn from qualifying purchases and sometimes recommend products from other sellers at no extra cost you. For more details see my disclosure policy and privacy policy.
You already know how to keep the Doom Track under control and cycle the Mythos Deck without panicking. That’s table stakes for anyone who’s logged more than a few sessions of Eldritch Horror. The next tier of play is narrower and less forgiving: learning which encounter cards are genuine decision points versus pure dice fate, and treating your team’s clue supply as a resource you actively manage rather than something you spend whenever it feels urgent.
This one picks up where our Eldritch Horror Strategy Guide: Managing the Doom Track and Mythos Deck leaves off. That guide already covers Doom Track pacing and Mythos Deck management in depth, so we won’t retread that ground here. Instead we’re going narrow: encounter card manipulation and the clue economy, the two levers that separate a team that survives from a team that’s actually in control.
Quick note before we dig in: everything below assumes a full base game setup and reasonable familiarity with the components. If your copy of Eldritch Horror has seen enough sessions that pieces are starting to wander off, that’s the edition we’re referencing throughout.
🎴 Reading Encounter Cards for Real Choice vs Pure Chance
Not every encounter card is created equal, and advanced players learn to spot the difference at a glance. Some encounters are pure dice tests with a pass or fail outcome and nothing you can do to influence which result you get beyond your base skill rating. Others hand you a genuine decision: choose which skill to test, choose which of two negative outcomes to accept, or choose whether to spend a resource for a better shot.

The cards worth slowing down for are the ones with branching text, options separated by “or,” or a choice of which stat to test against. These are the moments where table knowledge actually matters, since picking the wrong branch can cost you a card, a clue, or a companion you were planning to keep. Treat every encounter with a visible choice as a small decision tree rather than a coin flip, and read both branches before committing.
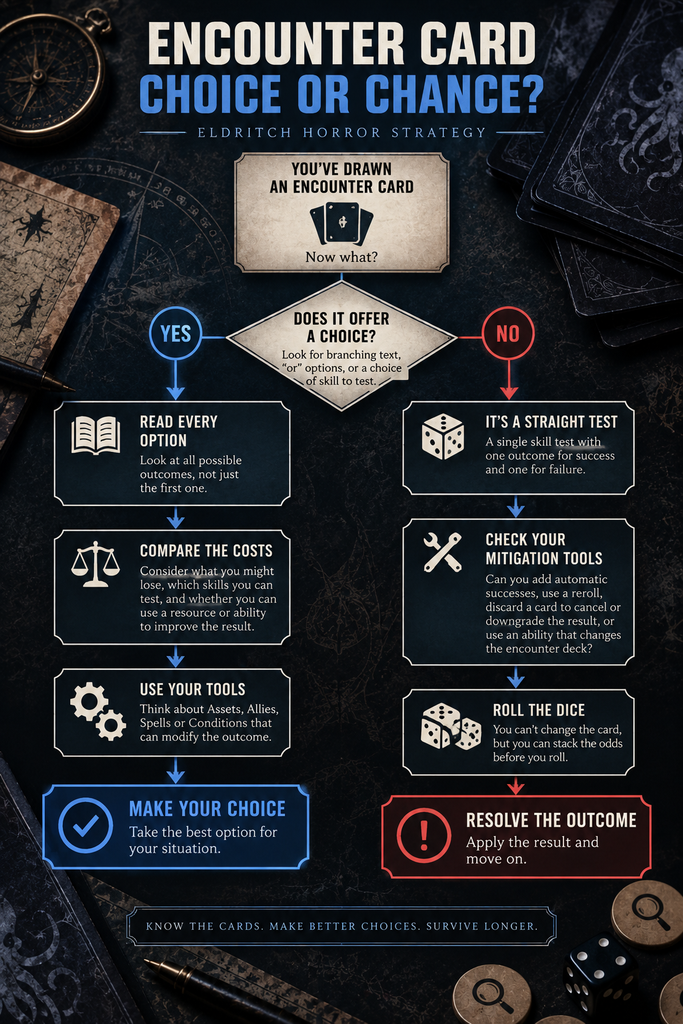
The purely random encounters, a single test with one outcome for pass and one for fail, are where your prep work from the next section pays off. You can’t out-think a flat test, but you can stack the odds before you ever flip the card.
🛠️ Building a Toolkit That Reshapes Encounter Outcomes
This is the lever most intermediate groups underuse. A meaningful slice of your Assets, Allies, Spells, and Conditions exist specifically to change what happens when you draw a bad encounter, not just to boost your stats on a good one.
Look for cards that do any of the following:
- Grant a reroll on a failed test regardless of the card’s printed skill bonus. Some Allies, like Agent of Secrets, hand out a reroll as a bonus effect separate from their stat boost.
- Add automatic successes you can apply before rolling any dice at all.
- Let you discard the card from hand to cancel or downgrade a negative encounter result.
- Allow you to choose which encounter deck to draw from, or swap a drawn card for a different one.
None of these tools are useful sitting in a deck instead of your hand. The advanced habit is checking the Reserve display at the start of every Upkeep phase, not just when you happen to have spare money. The four face-up Asset cards refresh from the top of the deck, and a card that looks mediocre in isolation, like a flat combat bonus, can be exactly the mitigation piece your team is missing if nobody’s picked one up in a few rounds.
Spells deserve a special mention because they’re renewable in a way single-use Conditions aren’t. An investigator who successfully casts and keeps a spell that grants a reroll or an automatic success is holding a repeatable insurance policy against bad draws, worth more over a long game than a one-time combat boost. Several expansions add even more of these mitigation tools if your group wants to expand the toolkit further, and our Eldritch Horror expansions guide breaks down which ones actually pull their weight.
🔍 The Clue Economy Is a Shared, Finite Resource
Clues do two jobs in Eldritch Horror, and advanced players hold both uses in their head at once. First, you can spend Clues for automatic successes on any test, which is the emergency brake every player reaches for instinctively. Second, active Mysteries routinely place Clues directly on the Mystery card and require investigators to spend them as one of the steps toward solving it, and solving Mysteries is how you actually win the game.
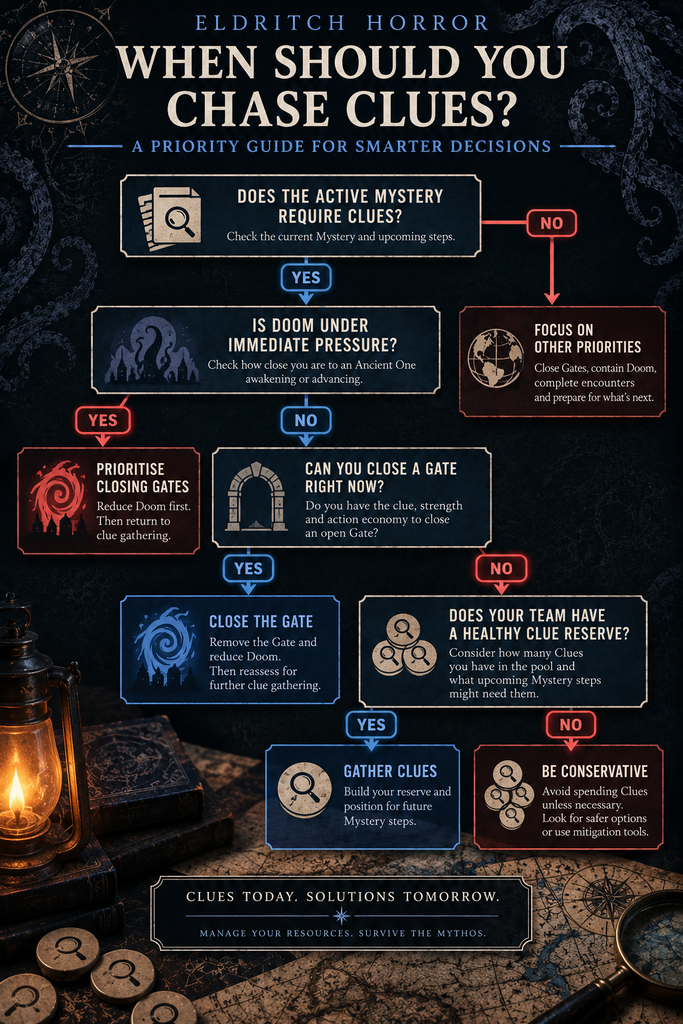
Those two uses compete directly with each other. Every Clue an investigator burns to survive a rough test is a Clue that isn’t available when your team finally draws the Mystery step that needs several of them. Because Clues are pulled from a shared pool with a hard token limit, one investigator hoarding or burning through Clues changes what’s available to the whole team, not just to them.
The instinct to spend feels safe in the moment. Failing a test can cost you time, cards, or health, and a Clue spent now feels like it’s buying certainty. Treat every Clue spend as a question with two answers, not one: what does this cost right now, and what does it cost the team later when a Mystery step needs Clues that are no longer on the board.
⚖️ A Framework for Prioritising Clue-Hunting
Advanced teams don’t gather Clues reflexively, they gather them on a schedule tied to what the Mystery deck is actually asking for. Use this rough order of priorities when deciding whether an investigator should divert toward a Clue-heavy space instead of chasing combat or a Gate:
- If the active Mystery card is already visible and shows a Clue requirement, gathering toward that number becomes the priority over almost everything else, since you know exactly what you’re banking for.
- If Doom is climbing fast and a Gate closure is available, that usually outranks Clue-hunting, since letting Doom run out ends the game regardless of your Clue stockpile.
- If neither pressure is urgent, default to keeping at least a small Clue reserve on the board, two or three tokens per active investigator is a reasonable floor, rather than spending down to zero on ordinary tests.
- Reassess every time a new Mystery flips, since the Clue requirement, if there is one, changes what “enough” actually means.
This isn’t a rigid formula so much as a discipline: check the active Mystery’s requirements before deciding an encounter test is worth burning your last Clue on.
⚠️ Advanced Misplays That Quietly Lose Games
Two mistakes show up constantly in experienced groups, and neither looks like a mistake in the moment.
The first is over-investing in one investigator’s personal Clue stack. It feels efficient to let your highest-Lore character hoard Clues for their own tests, but Clues aren’t personal property, they’re a shared pool tracked per location on the board. A team that lets one investigator sit on a pile of Clues while everyone else runs dry has less flexibility, not more, since those Clues can only be spent by someone standing at that location or as part of a Mystery step available to anyone.
The second is ignoring the Reserve display for multiple rounds in a row. Groups fixate on the encounter decks and forget that the Reserve is a controlled, non-random source of exactly the mitigation tools covered above. If nobody’s checked it since early game, there’s a real chance a useful reroll or automatic-success asset has been sitting there, ignored, while your team keeps eating bad encounter rolls.
🧩 How Team Composition Changes Your Clue Strategy
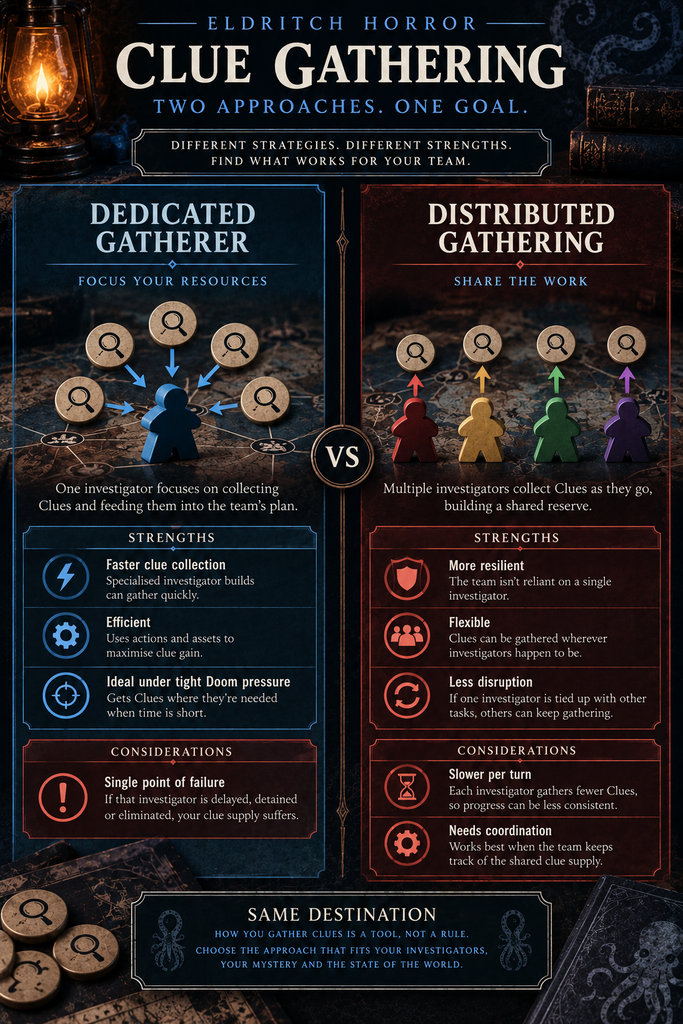
The investigators you draft shape which clue economy approach actually works. A team built around one dedicated Clue-gatherer, typically an investigator with a strong Lore or Influence rating and a starting location near Clue-dense spaces, can move Clues to wherever the active Mystery needs them fast. The tradeoff is that this investigator becomes a single point of failure: lose them to a Condition or a bad Gate encounter and your whole Clue pipeline stalls.
Distributed Clue-gathering spreads the load across three or four investigators who each pick up Clues opportunistically as they travel for other reasons. It’s slower and less efficient per turn, but it’s resilient. No single lost investigator collapses your Mystery-solving pace, and you’re less exposed to the “our Clue specialist is stuck fighting a monster on the other side of the map” problem that dedicated-gatherer teams run into. For a rundown of investigators who tend to fill either role well, see our best Eldritch Horror investigators for beginners guide; several of those picks double as strong dedicated Clue-gatherers even for veteran tables.
Neither approach is objectively correct. Fast, aggressive Ancient Ones with a tight Doom Track often reward the dedicated-gatherer’s speed, while slower Mysteries with generous turn counts tend to favour the distributed model’s resilience. Read the Ancient One’s Doom Track length before you draft your team, not after.
None of this replaces good dice luck, Eldritch Horror will always hand you an Ancient One that eats your best-laid plans. But teams that treat encounter cards as decision points instead of coin flips, and Clues as a shared resource instead of a personal stash, consistently outlast teams that don’t. That’s the difference between surviving a session and actually controlling one.